Kitchen is coming together. I feel like I waxed on about the design a little to heavy in a previous post, so thought I would stick to some practical construction aspects of actually building the thing.
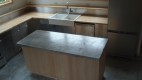
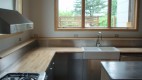
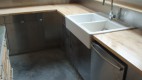
So, I had this vision of the stainless base cabinets with the butcher countertop contrasted with grey concrete counter and wood cabinets for island. Had the kitchen layout and sizing designed. Framed up the house, plumbing and electrical were in place, drywall, paint ect. Time came to run the Ikea gauntlet. Found out at the store that the stainless cabinets only come in a few select sizes. I was able to rework some things on the fly, but they don’t make a stainless corner cabinet, which I had to have. It’s a 2 hour drive up there and I needed to come home with some cabinets. Sheeeeeeit (Clay Davis style)
A lot of terrible solutions came to mind like reversing the kitchen where the stainless and butcher would be the island. But, I saw the island as the place where the magic happens and really wanted a surface that you could put hot pots on or roll out pie crusts and not be a pain in the ass to clean.
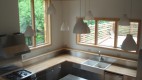
Anyway, bought the stainless and bought a white corner cabinet and figured I’d come up with something. Long story short, bought some 4′ x 8′ sheets of brushed stainless steel via the internet and worked with the awesome folks at Martin Roofing and sheet metal. They bent some pieces to clad the corner cabinet along with bending some stainless for my backsplash. Also, Ikea doesn’t make a stainless toe kick. I didn’t want to leave it open and create a fantastic home for crumbs and dust, so made some stainless toe kicks as well. It’s a nice touch.
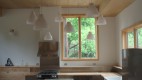
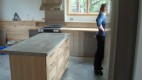
Another thing I like is the the little ledge shelf that it’s in the kitchen. Great place to put herbs, vases, whatever. That comes from my idea of wanting to use 4′ superior walls, but instead of building a floor on top and having a crawl space, we would pour a slab inside (that way the slab is encased in insulation and protected from the elements) and stack regular 8′ walls on top of the foundation. That way when you step down into the slab, you’ve got 12′ ceilings. By stacking 2 x6 walls on a 11″ foundation, you are left with this great opportunity. So, the ledge shelf detail carries around the dining room and the living room. My personal motto: always need to have a place to set your g & t in case you need to gesture wildly.
For the shelf we actually used stair treads that had yet to be cut for steps and were 16′ long. That way they were a really good grade and had a nice rounded nose on the front.
I also really dig the lights. You have to see it in person as they are all different heights and it’s pretty dramatic. I like it because it gives the feel of dropping the ceiling and making the kitchen feel more intimate.
Thinking about the ceiling (you can see the plywood ceiling in one of the photos): It’s a mosaic of 16″ wide by 8′ long pieces that I really like the look of. A little thing I’m proud of: We ripped 4′ wide pieces into thirds on the table saw (made a ton of sawdust for Jesse’s chickens as I recall). We made three separate piles that way each sheet of plywood being ripped in third would be in a separate stack. Then, when we installed it, we pulled from one stack completely before moving onto the next. That way we got a ton of variation and contrast between pieces and never put two of the same pieces next to each other. These are the things I enjoy thinking about.
Also plugged in the fridge. Ice cold lemonade from here on out.